Search This Blog

Monday, February 20, 2012

DIY Baby Shower Favors!


Here they are—my pride and joy.
After attending about 100 baby showers in the past five years (including four or five of my own), I finally hosted one!

My friend Jessica, who have I known practically since birth, is having a baby in March! Along with our moms, I helped host a shower to welcome her new little bundle of joy last weekend.

I got put in charge of decorations/games/favors. So for the past couple of months, I’ve had no end of fun researching ideas online (thank you, Pinterest!) and coming up with a decorating game plan. I’ll be posting another blog with all the decorations and how I made them.

For the favors, I knew early on that I wanted to use baby food jars. They are exactly the right size for a handful of candy, and conveniently, I have an eight-month-old baby at home who is more than happy to inhale the contents of those jars, so nothing is going to waste.

I made a trip to Michael’s to peruse the crafty baby stuff and got inspired for my favor.

Here’s how I made them, step by step:

Step 1: Buy some baby food. OR … get someone to save their jars (I needed a few extras, so I enlisted a fellow mom to save hers, too).

Mmmm ... carrots.

Step 2: Remove paper and clean jars and lids. I just ran them through the dishwasher.

Step 3: Choose a color and spray paint your lids. Jessica and her husband, Tony, have decided to be surprised on the sex of their baby, so I went with yellow. Interesting fact: I had to buy the spray paint in the suburbs of Chicago, not the city, where I live. Apparently the city of Chicago has banned the sale of spray paint due to the graffiti problem. From the looks of things in my neighborhood, there must be a lot of contraband spray paint floating around.

My dad helped me with this portion of the project. Spray paint is an acceptable man project, unlike tying little pink bows.

 Step 4: Glue a bauble of your choice to top of lid. I found these cute plastic pacifiers and secured them with a drop of good old Elmer’s glue.

The lids ended up having a kind of distressed look, which I loved!


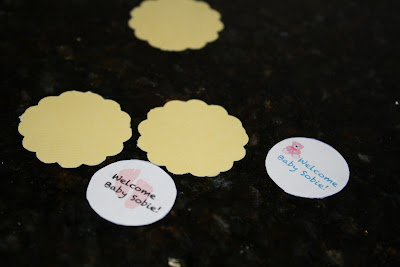
Step 5: It’s time to make your labels. I found some cute baby clip art online, pasted it into a Word document with the words “Welcome Baby Sobie” over it and that was that. I printed a bunch out and then traced a circle around them. Find any old household object to make your circle. I used a mini flashlight. Next I used my Martha Stewart decorative punch to make a flower shape out of colored card stock. I used double-sided tape to put the circle with words on it and, voila!

There are some slight imperfections, but that's how everyone knows they are homemade!

Step 6: We’re in the home stretch! The last step is to fill the jars with whatever candy you want—I used pastel Jelly Bellies—and tie a ribbon around the top of the jar.

Ta da! Is this cute or what?
There are many variations you could do on this favor. You could definitely leave the label off if you want to save some time and the color options are endless. There are also a ton of different embellishments you could use on the lid—I saw duckies and tiny clothespins to name a couple. Get creative and have fun!

Tuesday, January 31, 2012

Baby's First Valentine


I love Valentine’s Day. It’s pink and red and filled with sugar. What’s not to love?
Enough with the card monopoly, Christmas.


As a kid, the best part of Valentine’s Day was the cards. Remember making those “mailboxes” out of old shoe boxes for all the Valentines you would get from your classmates? Why don’t we do that as adults? I’ll tell you why: We’ve just come off of Christmas, and Christmas owns the card market.

Oh sure, you’ll go out and buy your sweetie a card, but there is no mass mailing of comfort and joy like there is at Christmas. But when you think about it, this is the time of year we NEED a little pick me up. By February, snow has lost its luster—literally, it’s now gray instead of white. Everyone is sick of the cold weather and it feels like a million years until summer.

Now, wouldn’t you like to open your mailbox and get a homemade Valentine about now? Fortunately for me, I have been the recipient of a hand-made card for many years. My friend Stacey, who inspired this idea, has taken photos of her kids and sent out homemade Valentines to family and close friends every year for about a decade.

And now that I have a child of my own, I decided to steal her tradition and adapt it to my own Valentine-making style. So let’s get on with it. Here’s how I created my daughter’s first Valentine.

Step 1: Figure out how many people you are sending this card to. Look at your Christmas list and eliminate about 90 percent. That brought me down to grandparents, aunts, uncles and Stacey (after all, I owe her about a dozen of these). So I was looking at making about eight Valentines—a reasonable number. If you have more people (say 12-15), consider how time consuming each hand-made Valentine will be and whether you are up to the challenge. No sense in biting off more than you can chew. You’ll just get frustrated and quit. Nobody likes a pissed-off crafty Cupid, so set realistic boundaries for yourself.

Step 2: Obtain an adorable child or baby (preferably your own) and set up a photo shoot. And by photo shoot I mean: Dress your kid in something cute and get her to smile for the camera against a backdrop of your choosing. Do not schedule a professional photographer for this (save that for the Christmas card). The whole point is homemade, remember? Grandmas live for this stuff. Before you set up the shoot, think about your final result. Is it a sweet Valentine? A funny one? A punk-rock one? Pick a general theme.

She's cute, huh?  True confession: I took not one, not ten, but 80 photos to get the shot I wanted. Thank goodness for digital cameras.

Step 3 (optional): If you have some Photoshopping skills (mine are minimal), have some fun with your photo. I took my original shot against a wrinkly sheet, so I changed the background to solid pink to make Isla look like she was floating. If you haven’t guessed, I chose to make my Valentine funny.


Tee hee. This just makes me laugh.


Step 4: Now we get crafty! You know what that means—it’s time for a trip to Michael’s (Joann Fabrics is fine, too)! Once you get to the craft mecca of your choice, go nuts. Seriously, just pick whatever appeals to you. You should have some sort of design in mind first though or it’s easy to just buy everything in sight. These crafty places suck you into their evil vortex of ribbons and glue.

Since I had a photo with a Pepto-Bismal pink background, I wanted my card (which the photo was going to be pasted onto) to be cream-colored. So I grabbed a pack of plain, flat ivory cards. I wanted said photo to be heart-shaped, so I found some stencils and added those to my stash. Now for the fun stuff (i.e. GLITTER). Among the many products Martha Stewart slaps her name on is glitter. And it’s not just any old glitter. This stuff is soft, powdery and sparkles like a diamond in the right light. I opted for purple.

Now that I had the core of what I needed to create my design, I threw in a few extras: glue, pack of pastel paper, double-sided tape, markers, mini-glittered heart stickers. 

Eat your heart out, Martha.


Step 5: Trace the heart stencil with a marker or pen directly onto the photo. Cut it out.
This was the easy part.


Step 6: Draw a conversation bubble onto a piece of pastel paper. Cut it out. Trace it seven more times and write “Happy Valentine’s Day” on each one. Cut them out and glue them to your photo. 
The technical term for these is "conversation bubbles."


Step 7: Trace your heart stencil onto the flat, cream-colored card. And now is the moment you’ve been waiting for. It’s glitter time. So dust off those elementary-school gluing skills and get ready to get messy (now is a good time to mention you should NOT attempt this project while your child is awake).

Dip a small, cheap paintbrush into a little pot of glitter paste (Martha makes this, too!) and trace just outside the line of the heart shape you just drew on the card. While glue is still wet, dump the glitter all over it. Shake off the excess glue and let dry.
It's ok to be a little sloppy—you're going to cover most of this up with the photo.


Step 8: After glitter has dried, use double-sided tape to secure heart photo to card. Glitter should make a nice outline. If you are a perfectionist, this part may be a bit painful for you. In case you’ve forgotten, glitter is messy business. Chances are, your glitter may scatter a bit. Just go with it—remember, HOMEMADE.
Almost there! Just a couple more finishing touches and you can wash your hands of Valentine's Day 2012!


Step 9: Add cute little heart stickers and sign the card. 
Ta da! And if you have extra heart stickers, slap them on the envelopes. The mailmen love a little extra glitter.


Step 10: Pat yourself on the back for going back to your third-grade roots and making Valentine’s Day extra special for the grandparents this year. And don’t forget to put away the margarita mix and tequila you needed to get yourself through the glittering and gluing portion of this craft.


Wednesday, January 18, 2012

Anatomy of a Nursery


A baby nursery is probably one of the easiest rooms in the house to put together. You can buy matching bedding, rugs, curtains and accessories at any number of baby stores and call it a day (or, better yet, register for all that stuff and let someone else buy it!). Paint your baby’s room pink or blue and voila, you have a complete room.

Finding out the sex of your baby is key if you want to buy a matched set of bedding and room accessories. They do make some neutral sets, but there aren’t nearly as many choices and you’ll just get frustrated as you force yourself to look past the adorable pink daisies or miniature fire trucks to evaluate yet another farm animal motif in green and yellow.

I know this from experience. My husband and I decided—much to the frustration of all our friends and family—to be surprised on the sex of our baby. And when she (Isla Grace) made her debut, it was indeed a big surprise and totally worth the wait.

The only time I ever regretted not knowing the sex was when we were putting together her nursery. For a girl, I envisioned palettes of pale pink and buttery yellow with toile bedding and lacy curtains. For a boy, I saw navy and cream with red accents and prints of trucks and airplanes hanging on the walls.

But instead, I was stuck with neutral. NEUTRAL. Even the word is boring. Fortunately for me, the second bedroom in our condo was painted a lovely, neutral shade of pale green. I, of course, would have preferred yellow or ivory or a bold pumpkin shade, but my husband was not going to repaint a perfectly good bedroom to suit my decorating whims. I could have convinced him otherwise had I felt very strongly about one of the other colors, but to be honest, I felt pretty neutral about all the neutral colors.

So green it was. We had a pretty good idea of what we wanted as far as crib furniture went: dark wood, clean lines, minimal items. A crib, dresser (which doubles as changing table) and a glider were all we had room for—no bookcases for this baby. As you can see from the photo below, we went for a dresser that had it all—room for diapers, books, clothes and a changing pad. It was the best investment in the room, hands down.


A little more about this dresser: I sometimes get annoyed with looking at the clutter that diapers, creams, etc. create, but convenience wins over aesthetics. When you need a diaper, you need a diaper—stat! No time for fiddling around with drawers and doors.

Also note to the left of the dresser there is a laundry basket and Diaper Genie. This little corner is basically where all the dirty stuff goes. We clean it often or things don’t smell so great. The laundry basket is sitting on top of a matching storage cube (I have two of these in the nursery) where we store toys and other paraphernalia since the closet is filled with my clothes (sorry Isla, mommy’s clothes are bigger!).

But I digress, let’s get back to the décor. You can also see the adorable alphabet and numbers prints hanging above the corner of poo. You can buy something almost just like it at Land of Nod or some other trendy store for around a hundred bucks. Or, you can get grandpa to make you a custom design for free! Needless to say, we went with option two.

So we had a room with green walls, white trim and doors, espresso-colored furniture and an oatmeal-colored shag rug. Did I forget to mention that? It came with the green walls in the spare bedroom. And since we weren’t buying one of those oh-so-convenient matched sets, the rug, in all its neutralness, stayed (see below).


You also get a view of our crib here. As you can see, I opted for colorful dots (by Skip Hop) instead of the omnipresent farm animals on the crib bedding. I also chose the ugliest mobile ever. That’s right, it’s ugly and I know it. But, just so you know, I spent hours pouring over websites trying to find the most beautiful mobile ever made for this crib.

But before I dropped $100 on a gorgeous toy, a good friend set me straight with this advice: “Buy the most colorful, obnoxious mobile you can find. And make sure it lights up and plays music.” Listening to her was one of the smartest things I’ve ever done. This mobile has served as a nighttime soother, a morning-time amusement and everything in between. A mobile without lights, bright colors and movement would have been for me, not for Isla.

As for the Sleep Sheep hanging woefully from the side of the crib—he has served his purpose as a nice white noise maker for little Isla.

At this point you’re probably wondering about the piece de résistance of Isla’s nursery—the giant monkey tree (below).


No, I did not paint this. We plan to sell our condo this year and I didn’t want prospective buyers to walk into the room and cringe at the thought of painting over my baby’s masterpiece. Instead, I went on etsy.com and bought a wall decal. These things are the best! There are about a million to choose from AND they are very inexpensive (around $80 for the whole thing). It took my husband and I a couple hours to put it up and voila, instant room décor! Plus, as an added bonus: Isla stares at those crazy monkeys all the time.

Speaking of crazy monkeys … as you can see, there are a few hanging out on the floating shelves. Why does every nursery have floating shelves? I’ve pondered this a lot as I sit and nurse my baby. My conclusion is this: You get lots of gifts when you have a baby, some are useful, some are not. Those that are not useful are decorative. You need some place to put the decorative stuff. And what’s better than a floating shelf? Well, a built-in book case would be nice, but I’ll save my rants on crappy storage in Chicago condos for another blog.

Now I’m going to take you to the most important corner of the nursery. Take a close look below.


As a mom, you will sit in and nurse (or bottle feed) your baby a LOT. It’s suuuuuper important to be comfortable. So get yourself in the market for a good glider—and don’t forget the footstool (it glides, too!).

Notice the small trash can to the side of the glider. This is KEY. I know you throw the really gross stuff in the Diaper Genie, but you’ll be surprised how often you need some place to just toss a wet wipe or whatever. Also note how close the dresser is to the chair. When you’re nursing (especially in the beginning), you get mega thirsty. You will want a place to sit your water bottle so it’s in easy reach. Oh, and that’s a humidifier hiding behind the trash can. You can buy way cuter humidifiers (froggies and other animals), this one is just a Walgreens basic.

This corner also contains my favorite nursery accessory—the lamp. Since Pottery Barn Kids only carries very gender specific items (or at least it feels that way), I bought this at PB Teen. I highly recommend checking out their site. It’s full of cool stuff that can easily be used in a baby’s room.

And if you are wondering why there’s a gigantic bottle of hand sanitizer next to the “teen” lamp, then you’ve never changed a diaper.

The prints above the chair were a gift from grandma and grandpa and add a more feminine touch to my nursery, which is no longer neutral—it’s a girl’s room!

And in case there is any doubt as to which girl’s room it is, I found this “i” at Anthropologie for her door (see below). I couldn’t resist it, and for $14, it was the perfect piece to complete Isla’s room!


Tuesday, August 31, 2010

Ruxbin

If I had to sum up how I felt about my experience at Wicker Park's Ruxbin in one word it would be "charmed."

This tiny (seats 32) bistro tucked away on Ashland Avenue (near Chicago and Ashland) oozes charm from the moment you step in and start soaking in the eclectic, warm atmosphere.

The clever—and aesthetically savvy—owners made the most of their small space. Look up and you'll see pages of old cook books plastered to the ceiling. Sit down and you realize the highly lacquered, sleek booth you're perched on is really an old schooldesk chair. You'll also find recycled seat belts stretched into seat backs and if you remember the bar/club Sonotheque, you'll recognize the glass panels from the DJ booth.  

It's a new spin on interior design—everything is recycled, refurbished or reused. And it works. The detail-oriented result is something you know you could never achieve at home, but it still has the warm, comforting feeling of your own living room—kind of like Ruxbin's menu.

We went in early August (I know, I'm a big slacker on posting this) and were treated to Ruxbin's summer menu. Like the restaurant itself, the menu was small, but full of familiar ingredients turned unique by creative flavor pairings.

Oh, before I forget, there are two things you need to know about Ruxbin: It's BYOB and they don't take reservations.

So we showed up on a Friday night around 7pm bottle-less (we forgot about the BYOB) and were directed by the hostess to The Noble Grape, a well-stocked little wine store around the corner. Fortunately for us, the Noble Grape happened to be having a wine tasting that evening, so we killed a little time there.

Back at Ruxbin, they took us to a small seating area near the kitchen where they uncorked one of our bottles and got us started with wine and some homemade, gourmet popcorn (a trend of which I HIGHLY approve).

When it came time to eat, we opted for the K-Town Empanadas for an appetizer (kimchee, chimichurri crème fraîche) and the Crispy Eggplant salad. Both were outstanding. The salad featured tempura-battered eggplant, beets and a honey-cardamom yogurt dressing. I know, sounds bizarre, but soooo delicious.
The Crispy Eggplant Salad
For our main course, I had the beef and George went for the trout. Both were prepared exquisitely. The hangar steak I had also had a cauliflower puree (which I practically licked off the plate) and the trout was paired, somewhat unusually, with dates and a bulgar wheat tabbouleh. The result was a richer, heavier flavor on the trout dish, which worked out well for us as we wanted a bottle of wine to go with both our dishes.
The Trout

Also good to note: The folks at The Noble Grape are familiar with the Ruxbin menu, so if you take a peak at the menu beforehand and let them know what you think you want to order,  they can direct you to the right bottle of wine.
The Panna Cotta

For dessert there were two options: panna cotta or flourless chocolate cake. I have no doubt the cake was amazing, but we wanted to go out of our normal comfort zone, so the panna cotta it was. And it was the perfect ending—light, fresh, and with a smattering of toasted coconut and lychee, just different enough to let us know the creativity and though that was put into it.


The new autumn menu debuts at Ruxbin September 7. I can't wait to try it!

Tuesday, July 6, 2010

Branch 27

After all the rampant barbecuing and pizza consumption that took place over the holiday weekend, my husband and I were in the mood for something a little more upscale last night.

So we wandered over to Branch 27, a newish West Town establishment with a creative, reasonably priced menu and nightly specials. Last night—much to George's delight—we stumbled upon "Mussel Monday."
For $12, you get your choice of four different preparations of mussels with garlic toast and a draft beer. George went for the mussels in chorizo-fennel cream sauce with garlic. I think his t-shirt says it all.

At the end of his feast, we had to wave the waiter over to take George's mussel bowl away as he didn't think he had the self control to stop himself from drinking the leftover sauce. According to the waiter, he wouldn't have been the first person to do this.

One of my favorite things about Branch 27 is their use of seasonal ingredients. When we were there this past spring, the menu had ramps (a wild onion) in almost every dish. Last night, morel mushrooms were heavily featured.

And since I can't say no to a morel, my decision was easy. The homemade tagliatelle pasta with morels and green onions was sublime. It was rich and fresh all at once and they gave me the perfect portion. I may be in the minority here, but I hate portions that are the size of my head. I do not like leftovers and I hate walking away from half the food I just paid for. Ok, rant over.

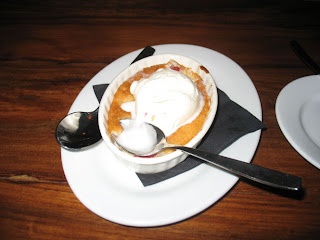
The dessert menu is small, but every item is a must-taste. On our last visit, we had the pot de caramel, which was perfect in texture and taste. This time, we went for the seasonal cherry cobbler.

Amazing. Chewy, soft, vanilla-flavored crust topped with tart cherries. All this deliciousness was served warm from the oven with a melting scoop of vanilla ice cream on top.

George and I always split a dessert. I regret this decision last night. For the first time, we actually pondered ordering the same dessert right after we finished the first one.

Fortunately, our memories of the weekend's gluttony prevailed and we refrained.


We also love the atmosphere at Branch. Dimly lit with giant globe lights, the bar area features comfortable, oversized booths and the dining room has exposed brick walls and a warm, contemporary vibe.

The menu isn't huge, but has a good variety of dishes, including a cheese board, a couple flat breads, some salads and a great burger. They're also known for their bread pudding, which will be next on my list of desserts to check off  ...

Monday, July 5, 2010

4th of July: Cupcakes, Pasta and Squash … Oh My!


One of the major gripes suburbanites have about living in the city is the lack of a yard. Ok, I get it—no place to let a dog or kids run loose and do their thing, nowhere to grow flowers, no place to enjoy nature. I see their point.

Although we have no plot of grass to call our own here in Wicker Park, we have something better: a rooftop deck. And it’s not just any old rooftop deck. It’s got a killer view, plenty of places to plant flowers (in pots, of course) and the best spot in the city for viewing fireworks. 

Yes, it’s only good for three months of the year (if we’re lucky), but on the bright side, we don’t have to shovel snow off it.

This weekend, we held our annual July 4 party, complete with booze, bratwursts and this year—babies (they’re starting to infiltrate at a fast pace). Surprisingly, the babies were unfazed by the chaos of party goers and fireworks being set off just a block away.

In addition to the bratwursts, we grilled burgers and hot dogs—the usual cookout fare. I always like to do a homemade side of some sort and this year opted for pasta salad. It got rave reviews, so here is the recipe (sort of—I just kind of threw it together).

Pesto Pasta Salad
Homemade Pesto: Put all ingredients below together in food processor. Pulse until smooth. Add more or less olive oil depending on how smooth/runny you want it.
• Basil leaves (4 cups or so)
• Parsley (3/4 cup)
• 1 cup of Parmesan
• 2 Tbsp lemon juice
• 5 or 6 cloves garlic
• Salt
• 1 cup of olive oil (more or less)
• 3 oz toasted pine nuts

Coat 2 lbs. cooked pasta (I used rotini) with pesto. Add three roasted red peppers (I chopped these in the food processor, too), 1 jar chopped kalamata olives and 2 cups crumbled feta. Serve at room temperature.

Cherry Mini Cupcakes
Of course, I never pass up an opportunity to bake—especially if there’s a theme. I saw this mini cupcake flag in a magazine and had to go for it. I made one of my favorite variations on white cake: cherry. Here’s how I did it:
Cherry Cake (note: this is adapted from the Cake Mix Doctor book)
• white cake mix
• 1 cup whole milk
• 1 stick butter, melted
• 3 large eggs
• ¼ cup maraschino cherry juice
• 1 jar chopped maraschino cherries

Once batter is mixed, I put it in a gallon size Ziploc bag and cut one of the corners off. I then squirt the batter into each mini cupcake (use paper liners). The recipe makes about 72 mini cupcakes.

Frosting
• stick of room temperature butter
• ½ cup Crisco
• 1 ½ lbs. powdered sugar
• ¾ cup milk (more or less—add slowly for perfect consistency)
• 2 tsp. almond extract

Squash for the Skeptic
As for the squash, well, I can’t take credit for that. My brother’s girlfriend, Chelsea, has recently returned to her vegetarian roots, and I have to hand it to her—she’s really good at being a vegetarian.

If I were a vegetarian, I’d probably just eat a tortilla with melted cheese in it for lunch, pasta every night and call it a day. Chelsea really embraces her vegetables though. Last night, she showed up with squash blossoms. What’s a squash blossom? I’m still not really sure, but she says you can get them at farmer’s markets.

What I do know is this: she stuffed those squash blossoms with goat cheese, quinoa and chickpeas and threw them on the grill for a few minutes, and they were deeeeeeeelicious.
Seriously, I could have had a plate of those and been perfectly happy. Well, maybe not totally happy. I’d need a half dozen mini cupcakes, too ...


Monday, June 28, 2010

A Weekend of Pie

In the pie vs. cake debate, I am always firmly in the cake camp. No matter how delicious the pie, a piece of cake frosted in buttercream always wins.

But I do concede to pie every once in a while. Thanksgiving—obviously—is a pie holiday. In fact, I'd say pie pretty much runs the show on that particular day. But I'll also give pie the summer season. Seasonal fruit = killer dessert.

This weekend, we had two dinner invitations—one to friends for a barbecue and one to my mother-in-law's. I volunteered to bring dessert to both and began to think of light, summery, not-too-sweet desserts.

For the first dinner (gourmet burgers and grilled veggies) I went with key lime pie. It's been my experience it's almost always a winner with everyone. And if you don't like it ... give it another try. It's worth it.

The problem with key lime pie is, there are a million variations on the recipe. There are frozen key lime pies, cheesecake versions, fluffy ones ... the list goes on. For mine, I just wanted the standard, creamy-tangy filling with a graham cracker crust.

So I do what I do when I always want the gold standard, I turned to Cook's Illustrated. If you aren't familiar with this magazine (I have their 1,000-recipe cookbook, too), the deal is this: they test everything. And then they write about it—in depth. So basically you reap the benefits of someone else doing all the homework. It rarely fails me.

Right away I spot areas in the recipe where I can cut corners. Make my own graham cracker crust? Much easier to just buy one. Squeeze the juice out of the limes? Why? I can just buy a bottle of key lime juice.

However, I try to be a purist when it comes to baking and I resisted the urge to cheat and did as the Cook's Illustrated gurus told me. The result was perfect. It was tart, but balanced by the buttery, sweet crust. The pie was creamy and thick, a texture unique to key lime. And did I mention easy? This is one of the simplest desserts I've ever made—but tastes like hours of work.

Below is the recipe with my notes:
Key Lime Pie
Lime Filling
• 4 teaspoons grated zest and 1/2 cup strained juice from 3 or 4 limes
*Laurel's Note: I had to use 5 limes and half a lemon (ran out of limes) to get a 1/2 cup. But, I also didn't have a juicer, so I don't think I got as much juice out. I also think the the lemon actually made the pie better since I was using regular limes, not key limes.
• 4 large egg yolks
1 (14-oz) can sweetened condensed milk

Graham Cracker Crust
• 9 graham crackers
• 2 tbsp sugar
• 5 tbsp melted butter
*Laurel's Note: Seriously, just make this. Don't buy a pre-made crust. This crust is so buttery and crunchy—it is truly the perfect complement to the pie. 

Whipped Cream Topping
• 3/4 cup chilled cream
• 1/4 cup powdered sugar
*Laurel's Note: Ok, true confession. I bought Redi-Whip and squirted it on. I paid the price for my negligence, too. It was the light version and practically disintegrated before it was served. Although the whipped topping is nice, it's not totally necessary. 

Instructions: Make the filling first so it can thicken while you make the crust. Whisk zest and yolks together until tinted green. Beat in condensed milk, then juice. Set aside at room temperature to thicken (about 30 minutes).

Process graham crackers in food processor until fine. Pulse in sugar until combined. Pour in warm melted butter and pulse until combined. Take out and press evenly into a pie pan. Bake 15-18 minutes at 325.

Let crust cool and then pour filling into crust. Bake 15-17 minutes at 325. Let cool to room temperature and then refrigerate until well chilled, at least 3 hours.

Whip the cream with sugar (use a hand-held mixer) and garnish pie or just dollop on each slice.
Adapted from The New Best Recipe from the editors of Cook's Illustrated.

Summer Berry Pie
After all that key lime perfection, I was reluctant to stray from such a winner. I almost whipped up key lime number two for our Sunday-night dinner with mom, but as I was flipping through the Cook's Illustrated cookbook, a recipe for Summer Berry Pie caught my eye and my curiosity got the best of me. And boy am I glad it did.

My mother-in-law is pretty picky about dessert. She's not, by nature, a sweets person, so finding a dessert she likes is challenging. Not only did she eat her pie, she also let me leave her some leftovers!

Once again, the tart/sweet combo was a winner. This time, it was the berries of summer that lent a little tartness and a lot of freshness to the pie. Juicy, refreshing and light—I can't think of a better way to end a warm summer evening of dining al fresco.

Here's the recipe!

Summer Berry Pie
Graham Cracker Crust: See above

Berry Filling
• 2 cups raspberries
• 2 cups blackberries
• 2 cups blueberries
• 1/2 cup sugar
• 3 tbsp cornstarch
• 1/8 tsp salt
• 1 tbsp lemon juice
• 2 tbsp red currant jelly (or whatever you have)

Whipped Topping: 2 cups, see recipe above

Instructions
Make the crust just like the key lime pie. Combine fruit in colander, wash and lay out on a towel to dry.
In a food processor, puree 2 1/2 cups of mixed berries until smooth. Strain through a mesh strainer into a saucepan (to get rid of seeds).

Whisk together sugar, cornstarch and salt and then whisk into puree. Bring puree to a boil on medium heat, stirring constantly with wooden spoon. When the mixture reaches a boil and the consistency of pudding, remove from heat and stir in lemon juice. Set aside and let cool slightly.

While puree is cooling, place remaining berries in bowl. Heat jelly in small saucepan to melt. Drizzle it over berries in bowl and gently toss with spatula to coat.

Pour berry puree into crust and distribute glazed berries over puree. Gently press them in.

Loosely cover with plastic wrap and refrigerate for at least three hours. Top with whipped cream!
*Laurel's Note: This pie was messy to serve! I think I put too many berries on top, which may have been part of the problem. But it was soooooo good that nobody cared.
Adapted from The New Best Recipe from the editors of Cook's Illustrated.